
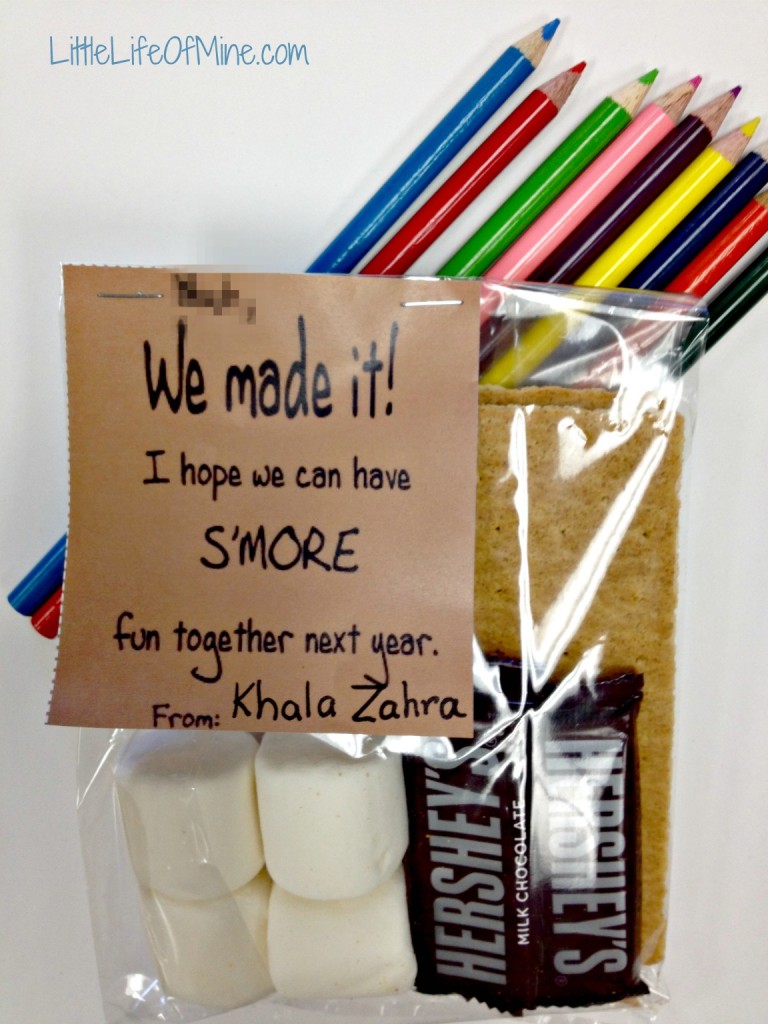
The end of the school year was fast approaching, quicker than I had anticipated. While I knew exactly what I wanted to give the students as an end of the year gift, I was at a complete loss for the teacher’s gift. Pinterest was filled with ideas, but nothing really clicked with me. Plus with the popularity of Pinterest, I didn’t want to show up with a repeat gift. There are no gift receipts for handmade presents!
I debated back and forth between a sentimental gift or something that could be used and enjoyed once. Being the big softie that I am, I went with the former. Now that I decided on that, I was still stuck. My brain was fried by the end of the year.
There’s some kind of magnetic pull that keeps bringing me back to Pinterest, and with good reason. I searched my pins and lo and behold, the perfect end of the year teacher’s gift, a thumbprint tree. I found some more inspiration images and then hit a brick wall. I. Can’t. Draw. Nope, not one bit.
However, my other half – no, not my husband – my best friend, is amazing in that department. I called her up with the promise of baked goods and a lifetime of favors if she would just do this one little tiny thing for me.
At first I thought I would just have her current class put their thumbprints. With only 15 students in the class, that would have made for a pretty skimpy tree. That’s when I thought a gift and a tree that could grow with her each year she teaches would have much more sentimental value. At the end of her teaching career, she’ll have a lovely and lush tree showcasing all the lives she’s left a print on.
Supplies:
- Acrylic paint
- Canvas board, the size depends on you
- Brushes

Directions:
Using your inspiration as a guide, lightly sketch your tree design onto the canvas. (Another option is to paint the sky first and then draw the trunk on top.)
Beginning with the sky, start painting! Using a few similar shades of paint, slightly mix the paint on a plate then brush on to the canvas to give a layered and textured look.
Once dry, move on to the tree. Using the similar paint technique, paint a heart onto the trunk. Use a paint marker to write on the teacher’s name.
Last, paint the grass. Using the same color combining technique and brush strokes as the sky and tree, draw the blades of grass upwards to give the canvas a new set of lines and movement.
Once the entire canvas is dry, finish off the edges with the appropriate colors.


For thumbprints:
Combine two shades of green in a small dish. Swirl paint together a bit to give the prints a more interesting and varied look. Have each child dip their finger in the paint. Dab lightly on the side of the dish to avoid too much paint being pressed on the canvas. Have the child pick a branch and gently press the fingerprint onto the canvas.
I debated adding names or initials on the leaves because I didn’t want to clutter the canvas. I felt it was more visually pleasing that way. However, I did write the student’s names and year on the back of the canvas (on the wooden frame, not the canvas itself).

I absolutely loved how it turned out! So much so, that I told my cousin to recreate one for me as a housewarming gift if I ever buy a home. How cute would that be to have a print from each friend of family member that has ever visited? This idea is mainly used as wedding guest book alternatives, but there are so many directions to go with it.
I can’t wait to see this tree grow each year as more and more students add their prints.

This is a beautiful gift for a teacher! It looks lovely 🙂
Thank you Mrs. Gaeul!
I absolutely LOVED this gift Amnah! 🙂 Can’t wait to put it up in the classroom!
So glad you liked it Zahra! Don’t forget to get the last two fingerprints from the students that left early! I really hope this is something that you will always treasure 🙂
What a great idea! Simply beautiful
Thank you! So simple, but a big impact, right?
We had one at my sister inlaw’s baby shower so she can hang it in the nursery.
So cute! I saw the pictures! Totally love when a gift has special meaning.
Wow, Masha’Allah! That is so beautiful!! What a great idea!!
Thanks Halima! Gotta love the internet and all the inspiration and ideas it gives us!